Bolt Torque/Flange Procedures

IPP Deltaflex® Flange Bolt Tightening Procedures
IPP recommends the following procedures to ensure a reliable and tight IPP Deltaflex® flange joint. For additional details, download the Plastic Pipe Institute’s (PPI) TN-38, bolt torque for polyethylene flanged joints bulletin (PDF).

Alignment

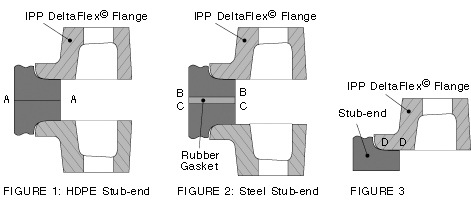
  1. The sealing faces of the two stub-ends in a joint should contact each other, or in the case of rubber gasketed joint, they should be parallel to each other all around the circumference and in full contact (see lines A–A, B–B, C–C in Fig. 1 and 2).
  2. The IPP Deltaflex® flange face D–D (see Fig. 3) should be in full contact with the upper face of the stub-end all around the circumference to avoid fulcrum effect, which will lead to leaking and even breaking of the flange itself while torqueing the bolts.

Bolt Tightening

  1. Install all the bolts and nuts finger-tight, ensuring at all times that the alignment conforms to figures 1, 2, and 3.
  2. As the first torqueing step, tighten the bolts in a crisscross sequence as shown in Fig. 4. Using a torque wrench with 20% of the final torque listed in the table on the other side of this sheet, taking care that points (I) and (II) are satisfied at all times.
  3. In the four remaining steps, repeat step two four times, each time increasing the torque by 20% of the final value.
  4. After reaching the final torque, use rotational tightening until all bolts are stable at the final torque value (in general, two complete times around is required).

Always use the crisscross pattern!

Caution! Do not use this procedure to align and/or pull the joint together.
This document reports accurate and reliable information to the best of our knowledge, but our suggestions and recommendations cannot be guaranteed because the conditions of use are beyond our control. Improved Piping Products (IPP) assumes no responsibility for the use of information presented herein and hereby disclaims all liability in regard to such use.